
If you want to install or reinstall Windows 11, one of the easiest solutions is to create a bootable USB drive.
In this guide, I’ll show you two simple methods to create a Windows 11 bootable USB, even if you are a beginner.
The first method uses Rufus, while the second method uses Microsoft’s official Windows 11 Media Creation Tool.
⚠️ Important: Creating a bootable USB will erase the files currently stored on the USB drive. Make sure to back up anything important before starting.
What You Need
Before creating your Windows 11 bootable USB, you will need:
- A USB flash drive with at least 8 GB of storage
- A Windows PC
- A reliable internet connection
- Windows 11 installation files or an ISO file
Microsoft recommends using an empty USB drive because its contents will be deleted during the creation process.
Method 1: Create a Windows 11 Bootable USB with Rufus
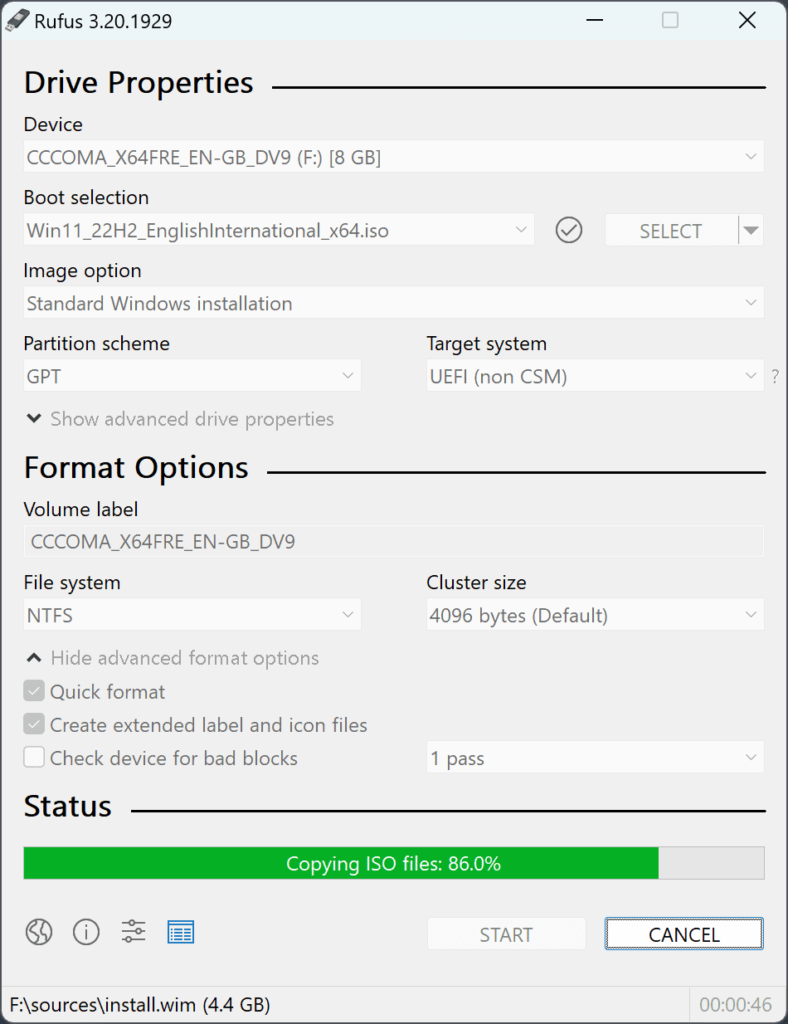
Rufus is a lightweight tool designed to create bootable USB drives from ISO files. It supports Windows and many other operating systems.
Step 1: Download Rufus
First, download Rufus from its official website.
Download Rufus from the official website
You don’t normally need to install Rufus. Download the executable and run it.
Step 2: Connect Your USB Drive
Plug your USB flash drive into your computer.
Open Rufus and make sure your USB drive appears under Device.
Be careful to select the correct USB drive because the data on it will be erased.
Step 3: Select the Windows 11 ISO
Under Boot selection, choose:
Disk or ISO image
Then click Select and choose your Windows 11 ISO file.
If you don’t already have the ISO, you can download Windows 11 directly from Microsoft.
Download Windows 11 from Microsoft
Step 4: Check the Rufus Settings
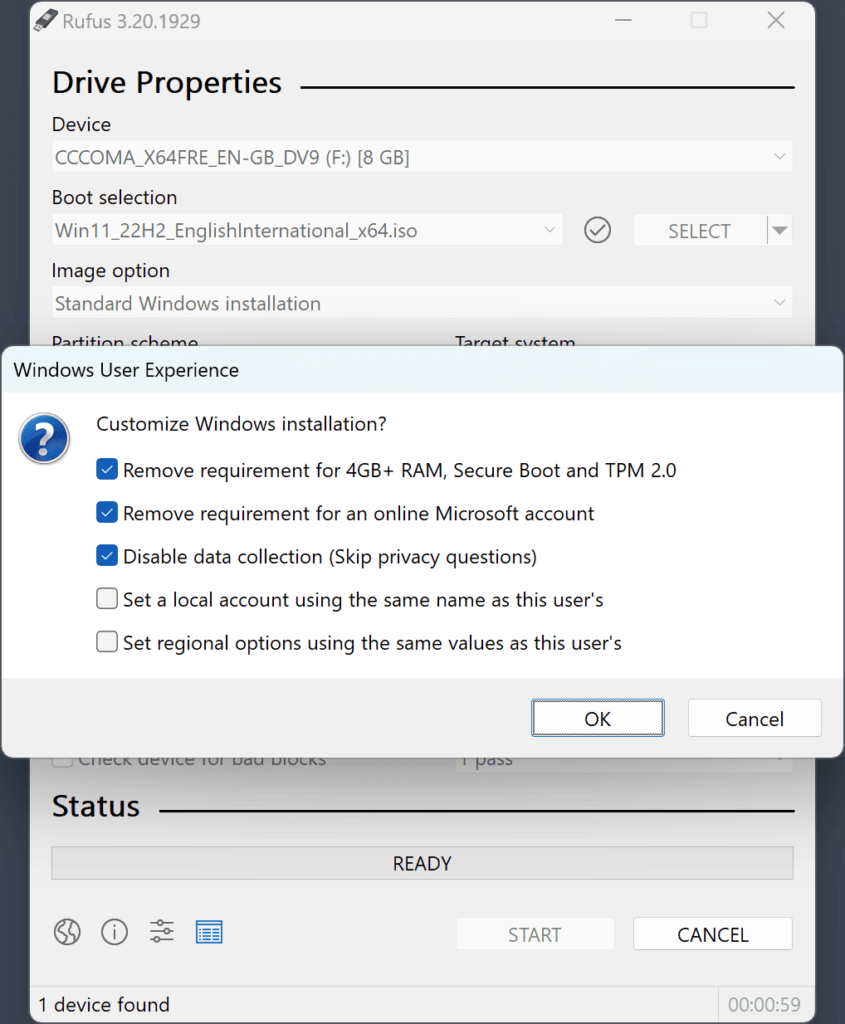
Rufus will display several options.
If you’re a beginner, you can normally keep the recommended settings.
For Windows 11, Rufus may also display additional Windows installation options, such as:
- Removing the TPM 2.0 and Secure Boot requirements
- Removing the Microsoft online account requirement
- Creating a local account
- Applying regional settings
- Reducing privacy questions
- Disabling automatic BitLocker encryption
Choose the options that match your needs.
Step 5: Start the Process
Click Start.
Rufus will warn you that the USB drive will be erased.
Make sure there are no important files on the USB drive, then confirm.
Rufus will now copy the Windows 11 installation files to the USB drive.
When the process is finished, your Windows 11 bootable USB is ready.
Watch the Full Rufus Tutorial
For a step-by-step demonstration, watch my video:
How to Create a Bootable USB with Rufus
In the video, I show the complete process and explain the Rufus options in a simple way for beginners.
Method 2: Create a Windows 11 Bootable USB with Microsoft’s Media Creation Tool
If you don’t want to use Rufus, you can also use Microsoft’s official Windows 11 Media Creation Tool.
This method is particularly convenient because the tool can download the Windows 11 installation files and create the installation USB for you. Microsoft officially provides this option for creating Windows 11 installation media.
Step 1: Download the Media Creation Tool
Go to Microsoft’s official Windows 11 download page.
Windows 11 Download – Microsoft
Look for Create Windows 11 Installation Media and select Download Now.
Step 2: Run the Tool
Open the downloaded Media Creation Tool and accept the license terms.
Then choose:
Create installation media for another PC
Click Next.
Step 3: Choose Your Settings
Select the appropriate:
- Language
- Windows 11 edition
- 64-bit architecture
Then click Next.
Step 4: Select USB Flash Drive
Choose:
USB flash drive
Connect your empty USB drive and select it from the list.
The tool will download the required Windows 11 files and create the bootable USB automatically. Microsoft recommends a blank USB drive with at least 8 GB of space.
Step 5: Wait for the Process to Finish
The download and creation process can take some time depending on your internet connection and USB speed.
When it is finished, you will have a Windows 11 installation USB ready to use.
Watch the Second Tutorial
If you want to see another way to create a Windows 11 bootable USB, you can also watch this tutorial:
Create a Windows 11 Bootable USB in 3 Minutes
This gives you another option if you prefer a simpler alternative to Rufus.
Rufus vs. Media Creation Tool
Both methods can create Windows 11 installation media, but they are useful in slightly different situations.
| Method | Best for |
|---|---|
| Rufus | Users who already have a Windows 11 ISO and want more control |
| Media Creation Tool | Beginners who want Microsoft’s official tool to create the USB |
If you already have a Windows 11 ISO, Rufus is a very convenient choice.
If you want Microsoft to handle the Windows 11 download and USB creation, the Media Creation Tool is a straightforward option.
Important Things to Remember
Before creating your bootable USB:
- Back up important files from the USB drive.
- Make sure you select the correct USB drive.
- Use a USB drive with at least 8 GB of available space.
- Download Windows 11 from Microsoft’s official website whenever possible.
- Check your PC’s compatibility before installing Windows 11.
Microsoft notes that installing Windows 11 on hardware that does not meet its minimum requirements can cause compatibility issues and may affect support and updates.
Conclusion
Creating a Windows 11 bootable USB is easier than it may seem.
You have two simple options:
Method 1: Use Rufus with a Windows 11 ISO.
Method 2: Use Microsoft’s Media Creation Tool to create the installation USB.
If you’re a beginner, follow the video tutorials above step by step, and always remember to back up your important files before starting.
Related video: How to Create a Bootable USB with Rufus




Leave a Comment